That sickening sound of metal scraping against concrete is one every driver dreads. You turn to see it: a fresh, ugly gash on your once-perfect alloy wheel. If you’re a Tesla owner, you know that sleek, black turbine rim now has a glaring imperfection. So, what’s your next move? Do you live with the eyesore, or do you face the daunting and potentially expensive prospect of a professional repair?
If you’re considering a DIY solution, choosing the right wheel rash repair kit is key. Start by listing your must-have features, then match them to your budget and typical driving scenarios. Check the build quality, warranty, and any included accessories. Finally, compare trade-offs like ease of use, drying time, and finish durability so you can buy with confidence. Use the table below to scan pros and cons at a glance and shortlist the models that make the most sense for you.
| Product Image | Product Name | Best For | Prices |
|---|---|---|---|
 | Tesla Model X Onyx Black Wheel R | Tesla Model X Owners | Prices |
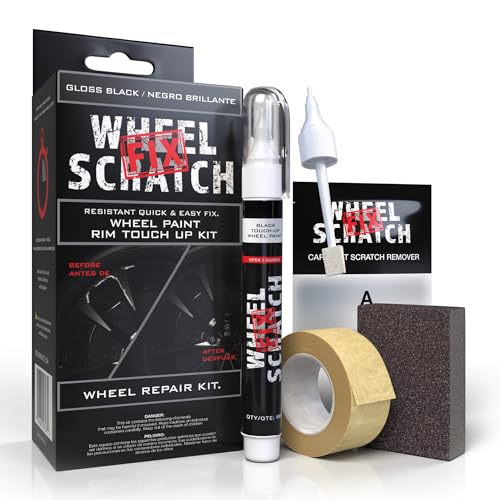
Tesla Model X Onyx Black Wheel Repair Kit
If you’re a Tesla Model X owner tired of unsightly curb rash, this Onyx Black repair kit offers a perfect solution.
The process is incredibly straightforward. The kit includes a pre-mixed filler, a smoothing tool, and a color-matched paint pen. You simply clean the wheel, apply the filler to the scuffed area, let it dry, sand it smooth, and apply the final coat of paint. For a minor scrape, you can complete the repair in under an hour, saving you a costly trip to a professional shop.
Beyond ease of use, the finish is remarkably durable and the color match is spot-on. Once cured, the repaired area blends seamlessly with the rest of your Onyx Black wheel and withstands regular washing and driving conditions. It’s a cost-effective and reliable way to restore your wheels to their original, sleek appearance.
Pros:
- 🟢 Excellent color match for factory Onyx Black wheels
- 🟢 All-in-one kit includes everything needed for the job
- 🟢 Saves hundreds compared to professional wheel repair
- 🟢 Simple, DIY-friendly process with clear instructions
- 🟢 Durable finish that holds up well after curing
Cons:
- 🔴 Requires patience and a steady hand for a flawless result
- 🔴 The repair might be noticeable on very deep gouges
- 🔴 Curing time means you can’t drive the car immediately
Buyer’s Guide: 3 Key Factors to Consider
Before you pick a DIY wheel rash repair kit, focusing on a few key details will ensure you get professional-looking results without the professional price tag.
Durability & Finish Quality
The goal of any repair is long-lasting results. Prioritize kits that include a clear coat top layer. This is essential for shielding your repair from UV rays, brake dust, and road debris. A high-quality, UV-resistant clear coat is what turns a temporary patch into a durable, permanent fix.
Ease of Application
If you’re not a professional, the process should be straightforward. Look for all-in-one kits that include everything you need—from sanding tools and applicators to the paints and clear coat. Systems with pre-measured components or simple mixing instructions minimize errors and frustration, leading to a much smoother experience.
Color Match Accuracy
A poor color match can draw more attention than the original damage. The best kits offer a wide range of standard alloy wheel colors, and some even provide custom-matching services. Always verify your vehicle’s exact wheel color code (often found in the door jamb or owner’s manual) before you buy.
Frequently Asked Questions
Q1: How long does a DIY wheel rash repair typically last?
A1: With proper preparation and application, a high-quality DIY repair can last several years. The clear coat is critical; a durable, UV-resistant top layer is vital for protecting the repair from the elements and maintaining its appearance.
Q2: Can I use these kits on chrome or fully polished wheels?
A2: Most standard DIY repair kits are formulated for painted or clear-coated alloy wheels. They are generally not suitable for bare chrome or polished metal surfaces, as the material may not adhere properly and the finish will likely be unsatisfactory.
Q3: What’s the most common mistake people make when doing this repair themselves?
A3: Rushing the preparation stage. Skipping thorough cleaning, inadequate sanding, or applying paint before the surface is completely dry and dust-free are the most common reasons for a poor finish. Patience during prep is the key to a professional-looking result.
Q4: Do I need any special tools to complete the repair?
A4: Most comprehensive kits include all the necessary sanding pads, applicators, and paints. You will typically need some common items like microfiber cloths, masking tape to protect your tire, and a well-ventilated workspace.
Q5: How noticeable will the repair be once it’s finished?
A5: For minor to moderate rash, a well-executed repair can be very difficult to spot from a few feet away. The aim is a significant cosmetic improvement that blends seamlessly, making the damage far less obvious—even if it’s not always absolutely perfect.
Final Verdict: Which One Should You Buy?
For most DIYers looking for a professional-grade finish without the complexity, the Reesi kit is our top recommendation for 2025. Its advanced bonding formula and UV-resistant clear coat deliver a durable repair that resists yellowing and chipping over time. If you want a reliable, all-in-one solution to restore your wheels to a like-new appearance while saving on shop costs, the Reesi kit is a smart and worthwhile investment.