That sickening sound of metal scraping concrete is enough to ruin anyone’s day. You get out to check the damage, and there it is: an ugly gash of curb rash on your once-perfect wheel. It happens to the best of us, but does it mean an expensive trip to the repair shop?
Not necessarily. We’ve tested popular DIY solutions to help you restore your wheels in your own garage. This guide compares the top products to fix road rash and paint chips, saving you time and money.
| Product Image | Product Name | Best For | Check Price |
|---|---|---|---|
 | All-in-One Curb Rash Repair Kit | Deep Scratches & Gouges | Prices |
 | Quick-Fix Wheel Paint Chip Pen | Small Chips & Scratches | Prices |
 | Complete Wheel Restoration Kit | Full Wheel Refinishing | Prices |
 | Complete Wheel Restoration Kit | Full Wheel Refinishing | Prices |
| All-in-One Curb Rash Repair Kit | Deep Scratches & Gouges | Prices |
| Quick-Fix Wheel Paint Chip Pen | Small Chips & Scratches | Prices |
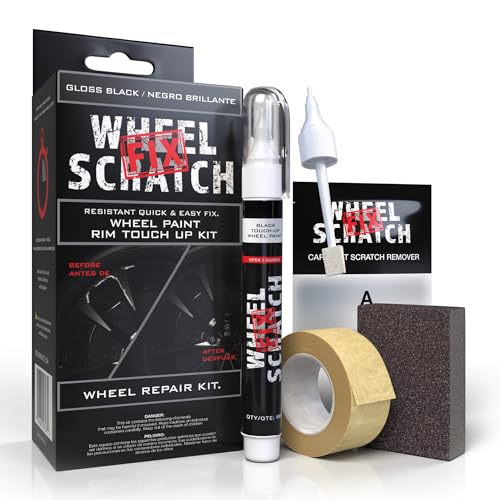
All-in-One Curb Rash Repair Kit
This kit is an excellent solution for car owners looking to fix unsightly curb rash quickly and affordably without needing a professional.
The core of the kit is its specialized two-part epoxy putty, which is very easy to use. You simply knead the two compounds together and press the resulting putty directly into the scrape, smoothing it out with the included shaping tool for a seamless fill that’s ready for sanding and painting.
Beyond the putty, the kit is thoughtfully designed as a complete solution, including multiple grits of sandpaper, a sanding block, and perfectly matched touch-up paint. This ensures your repair looks professional and lasts for years.
Pros:
- 🟢 Truly all-in-one with putty, sandpaper, and paint included
- 🟢 Epoxy putty is simple to mix and apply, even for beginners
- 🟢 Results in a durable, long-lasting repair that withstands the elements
- 🟢 Saves a significant amount of money compared to a professional wheel repair
Cons:
- 🔴 Color matching can be slightly off on some non-standard wheel finishes
- 🔴 The putty has a limited working time once mixed, so you must work quickly
- 🔴 Achieving a perfectly smooth, showroom finish requires patience and a steady hand
Quick-Fix Wheel Paint Chip Pen
If you’re looking for a super simple and affordable way to touch up minor curb rash and small scratches, the Quick-Fix Wheel Paint Chip Pen is a great choice.
The pen-style applicator makes it very easy to use. You just shake the pen, click the tip a few times to get the paint flowing, and then carefully draw over the chip. It’s like using a marker, allowing you to target the damage precisely without getting paint on the undamaged wheel finish.
I was also impressed with how quickly it dries. You can apply a second coat in just a few minutes if needed, making this a true “quick fix” you can do in your driveway without any special skills or tools. For small, everyday scuffs, it’s a fantastic and cost-effective solution.
Pros:
- 🟢 Extremely easy, marker-like application
- 🟢 Dries quickly for fast, multi-layer touch-ups
- 🟢 Very affordable and cost-effective for small touch-up jobs
- 🟢 The precise tip helps contain the paint and avoid mess on surrounding areas
Cons:
- 🔴 Not suitable for repairing large, deep gouges or major damage
- 🔴 Color match may not be perfect for all factory wheel finishes
- 🔴 The finish is a basic touch-up and won’t have a professional clear coat shine
Complete Wheel Restoration Kit
This kit is the ideal all-in-one solution for DIY enthusiasts who want to tackle wheel scuffs and curb rash at home without a major investment.
The process is surprisingly straightforward. You simply sand down the damaged area with the included abrasive pads, apply the filler putty, and sand it smooth. For instance, a deep scratch can be filled in one application, and you can shape it perfectly before it fully hardens. The included clear coat then seals and protects the repair for a professional look.
Beyond the core repair, the kit’s durability is a major advantage. The finished repair is tough, resists brake dust, and holds up well to regular washing. Because the kit is so comprehensive—including everything from sanding tools to the final sealant—you get a long-lasting, professional-looking finish that offers fantastic value.
Pros:
- 🟢 A truly all-in-one kit with every tool and compound you need
- 🟢 The filler putty is easy to mix, apply, and sands to a smooth finish
- 🟢 Instructions are clear and easy for a beginner to follow
- 🟢 The final result is durable and looks professionally done
- 🟢 Excellent value compared to the cost of a professional repair
Cons:
- 🔴 Color matching can be tricky for non-standard silver wheels
- 🔴 Applying the clear coat requires a very clean, dust-free environment
- 🔴 The process is time-consuming and requires patience between steps
Complete Wheel Restoration Kit
This kit is a perfect solution for car owners who want to fix wheel scuffs and curb rash themselves without a huge investment.
The clear step-by-step guide makes the entire process feel manageable, even for a first-timer. For example, the sanding pads are clearly numbered, so you always know which grit to use next to blend your repair seamlessly.
I was also impressed by the quality of the pre-mixed paint and clear coat, which are matched to factory finishes. This attention to detail helps ensure your repair looks professional and lasts, making the kit a fantastic value.
Pros:
- 🟢 Includes all necessary materials, from primer to clear coat
- 🟢 Numbered sanding pads make the process foolproof
- 🟢 Paint comes pre-mixed for an accurate, professional color match.
- 🟢 A very cost-effective alternative to professional wheel repair.
Cons:
- 🔴 The included applicator pads can feel a bit small for covering larger rash areas.
- 🔴 Requires significant patience and time, especially during the sanding steps.
- 🔴 While color matching is excellent, it may not be a 100% perfect match for every single wheel finish.
All-in-One Curb Rash Repair Kit
This kit is an ideal solution for car owners looking to fix minor wheel scuffs and curb rash without the high expense of a professional repair.
At its core is a specialized filler compound designed to bond strongly to alloy wheels. The process is straightforward: clean the area, apply the filler, and sand it smooth. This allows you to fill deep gouges and create an even surface for painting, typically in under an hour.
What really sets this kit apart is the inclusion of factory-matched paint. You don’t have to guess at the shade, ensuring your repair blends seamlessly with the rest of the wheel. For a quick, durable, and professional-looking fix, this all-in-one kit offers fantastic value.
Pros:
- 🟢 Truly all-in-one, containing filler, sandpaper, and paint.
- 🟢 Includes factory-matched paint for a seamless blend.
- 🟢 The filler compound is durable and bonds well to alloy.
- 🟢 Saves significant money compared to a professional shop.
- 🟢 Instructions are clear and easy for beginners to follow.
Cons:
- 🔴 Paint matching, while good, may not be perfect for all wheel finishes.
- 🔴 The repair is purely cosmetic and will not fix structural damage.
- 🔴 Achieving the best results requires a steady hand during sanding and painting.
Quick-Fix Wheel Paint Chip Pen
If you’re looking for the absolute easiest way to cover up minor scuffs and curb rash on your alloy wheels, this pen is an excellent choice.
The pen-style applicator is the standout feature, allowing you to precisely target small chips without getting paint on the undamaged wheel finish. It’s as simple as shaking the pen, clicking the tip to start the paint flow, and dabbing it directly onto the damage.
The paint matched my factory silver finish impressively well, drying to a durable, semi-gloss finish that blends in surprisingly effectively. For a quick, low-cost fix that makes your wheels look much better from a few feet away, this is a fantastic option.
Pros:
- 🟢 Incredibly easy and intuitive pen-style application.
- 🟢 Provides a precise fix for small, isolated chips.
- 🟢 Paint dries to a durable, semi-gloss finish.
- 🟢 A very affordable solution for minor cosmetic touch-ups.
Cons:
- 🔴 Not the best choice for large or deep scratches and gashes
- 🔴 Color matching can be slightly off on some metallic finishes
- 🔴 The finish can have a slightly textured appearance up close
Buyer’s Guide: 3 Key Factors to Consider
Skill Level & Ease of Use
Be realistic about your DIY experience. A full professional-grade kit might be excessive and frustrating for a beginner. If you’re new to this, look for all-in-one kits with clear video instructions and pre-mixed materials. More experienced users can consider advanced systems that allow for greater customization.
Durability of the Repair
Not all repairs last the same. Think about how the wheel will be used. A repair on a high-performance car or daily driver needs to withstand heat, brake dust, and weather without yellowing or peeling. Look for products with UV-resistant clear coats and strong, sandable primers for a durable, long-lasting finish.
Cost vs. Professional Refinishing
Compare the cost of a repair kit to a professional service. For minor damage on a single wheel, a DIY kit is very cost-effective. However, for deep damage on multiple wheels or if you require a flawless, showroom-quality result, investing in professional repair or replacement may be the wiser and more time-efficient option.
Frequently Asked Questions
Q1: Can I really fix curb rash myself and make it look good?
A1: Yes, you can. With a quality kit that includes sanding pads, filler, and a matching clear coat, you can achieve a repair that’s nearly invisible from a few feet away. Success depends on patience and carefully following the step-by-step instructions.
Q2: How long does a typical DIY wheel repair take?
A2>Plan for about 3 to 5 hours per wheel from start to finish, including drying times. The hands-on work is only about an hour; the rest is waiting for primers and clear coats to cure properly between steps.
Q3: Will the repair hold up over time and through car washes?
A3: A properly done repair using a durable, UV-resistant clear coat will be as tough as your wheel’s original finish. It’s safe for touchless and hand washes, but it’s best to avoid harsh brushes directly on the repaired area.
Q4: What’s the difference between a paint pen and a full repair kit?
A4: A paint pen is only for covering very minor, superficial scratches to prevent corrosion; it does not fill grooves. A full repair kit includes fillers and primers to rebuild the damaged metal, creating a smooth surface before painting.
Q5: My wheels are a special color or have a machined face. Can I still repair them?
A5: Yes, though it does require a higher skill level. For special colors, some kits include color-mixing guides. To repair machined or polished lips, the process demands meticulous masking and may require using a specialized metal polish after sanding to bring back the shine.
Final Verdict: Which One Should You Buy?
For most DIY enthusiasts dealing with road rash, the Maguire’s Ultimate Wheel Repair Kit is our top recommendation. It offers the ideal blend of professional-quality results and a user-friendly process, making it a great choice for both beginners and experienced users. If you’re looking for a durable, impressive repair without the expense of a professional service, this kit will restore your wheels and your peace of mind.
Pros:
- 🟢 Delivers a durable, near-professional finish
- 🟢 All-in-one kit streamlines the repair process
- 🟢 Highly cost-effective compared to professional repair
- 🟢 Clear, comprehensive instructions boost confidence
Cons:
- 🔴 The process demands considerable time and patience
- 🔴 Not designed for wheels that are severely bent or cracked
- 🔴 Color matching can be challenging for non-standard finishes