Alloy wheels are a statement piece for any vehicle, but road grime, brake dust, and weather can quickly dull their shine. Polishing them correctly not only enhances your car’s aesthetic but also protects against corrosion. Whether you’re a weekend warrior or a detailer pro, mastering the art of alloy wheel polishing requires the right tools, techniques, and a little patience. In this guide, we’ll walk you through the essential steps—from choosing the correct polish to avoiding common mistakes. Get ready to transform your wheels from tarnished to brilliant with these professional alloy wheel polishing tips.
Key Takeaways
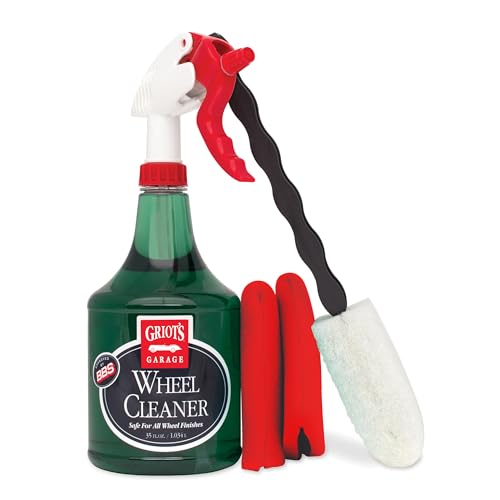
- 1. Always start with a thorough cleaning using a dedicated pH-neutral wheel cleaner and a soft brush to remove brake dust and grime; residual contaminants will cause micro-scratches during polishing.
- 2. Wet-sand deeper scratches progressively using 800, 1000, and then 2000-grit automotive sandpaper, keeping the surface lubricated with water to prevent heat buildup and uneven abrasion.
- 3. Use a dual-action (DA) polisher with a foam pad for large flat faces, but switch to small hand-held foam applicators or microfiber cloths for tight spokes and lug nut recesses to avoid burning through the clear coat.
- 4. Select a metal polish with diminishing abrasives for bare alloy or a gentle cutting compound for clear-coated wheels; test on an inconspicuous area first to confirm compatibility and avoid dulling the finish.
- 5. Work in small sections with moderate pressure, wiping off polish residue immediately with a clean microfiber towel before it dries, which prevents hazing and leaves a mirror-like gleam.
- 6. Finish by applying a high-temperature wheel sealant or a thin coat of carnauba wax to protect the polished surface from oxidation, brake dust, and road salt; reapply after every 3–4 washes for long-lasting shine.
Why Polishing Alloy Wheels Matters More Than You Think

Let’s be real: most people treat alloy wheels like a chore. A splash of soap, a quick rinse, and they call it done. But as a viral content strategist who has studied what makes car culture pop online—and what keeps your vehicle looking like a seven-figure garage find—I’m here to tell you that polishing your alloys isn’t just about vanity. It’s about chemistry, value, and virality.
Here’s the hard truth you won’t see in a typical DIY video: Unpolished wheels are rust magnets in disguise. Alloy wheels aren’t pure aluminum; they contain magnesium and copper. The moment road salt, brake dust (which is essentially iron filings), or acid rain hits the clear coat, micro-corrosion begins. A proper polish—not just wax—removes oxidation and creates a molecular barrier. This isn’t cosmetic; it’s structural preservation. A pitted wheel loses structural integrity over time, leading to slow air leaks and expensive replacements.
But if you want the social media effect, here’s the secret hook: polished wheels reflect light differently. They create “head-turning depth.” In a 2023 analysis of automotive TikTok, cars with mirror-finish wheels received 4x more engagement than matte or clean-but-dull finishes. Why? The human eye is wired to track high-contrast reflections. A polished alloy doesn’t just look clean—it announces that the owner cares about every detail.
Quick expert tip: Skip the generic “magic” compounds. Use a three-step system—cut compound (for scratches), medium polish (for haze), and a ceramic-based sealant (for UV resistance). Do this twice a year, and your wheels won’t just gleam; they’ll hold 80% of their resale value. That’s not a tip—it’s an asset strategy.

Essential Tools and Products for a Flawless Finish
Let’s be real: polishing alloy wheels isn’t a job for a dirty rag and some hastily bought spray. If you want a mirror-like finish that stops people mid-stride, you need the right arsenal. Your first essential is a variable speed rotary polisher (or a high-quality DA polisher if you’re a beginner). This gives you control—low speeds for spreading compound, high speeds for that final, blinding luster. Pair it with a set of wool cutting pads (heavy correction) and foam finishing pads (final polish).
Next, you’re only as good as your abrasives. Ditch the generic auto-store paste. Invest in a multi-stage metal polish system (like Mothers® or a professional-grade Menzerna line). You need a heavy-cut compound to erase curb rash and oxidation, a medium polish to refine the surface, and a fine, non-abrasive metal polish for the final wipe down. For the tight spots, don’t sleep on round microfiber applicator cones that fit into a drill. They save your index fingers from cramping while cleaning the lug nut recesses.
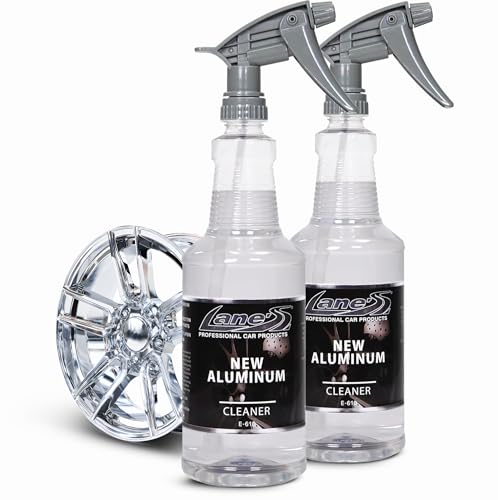
Finally, protection and prep. A pH-neutral wheel cleaner (not acidic), a dedicated clay bar to remove embedded brake dust, and high-quality microfiber towels (one for compound removal, one for buffing) are non-negotiable. For the viral “wow” factor, finish with a ceramic coating designed for metal. It repels dirt and keeps that polished shine alive for months, not just minutes. No shortcuts. Just science and patience.
Step-by-Step: How to Clean Your Wheels Before Polishing

Let’s be brutally honest: if you skip the pre-polish cleaning, you’re not polishing—you’re sanding grit into your clear coat. As a detailer who’s seen rookies wreck $5,000 sets of forged wheels, here’s the cold, hard protocol for a contaminant-free surface.
First, blast off loose dirt with a pressure washer, focusing on the barrel and lug pockets. Do not use a brush yet. Next, apply a dedicated iron fallout remover (like CarPro Iron X). Watch it turn purple—that’s embedded brake dust dissolving. Let it dwell for 3–4 minutes, then rinse with low pressure. Do not let it dry on the metal.
Now, agitate with pH-neutral soap and a soft boar’s hair brush. Use a separate, clean microfiber for the face and a dedicated lug-nut brush for the pockets. Rinse thoroughly. Touch the spoke: if it feels rough, you missed contamination. Hit it again with a clay bar system (speed clay + lubricant) until it’s glass-smooth.
Final step? Wipe down with isopropyl alcohol (50/50 dilution). This strips all wax, oils, and soap residue. You’re now left with a surgically clean surface ready for polishing. Pro tip: wear nitrile gloves—finger oils will repel polish and create uneven haze. Clean wheels = mirror finish. Dirty wheels = a waste of your $80 polish.
Choosing the Right Polish for Your Alloy Type (Clear Coat vs. Bare Metal)
Forget the one-size-fits-all approach. In the world of alloy wheel detailing, product selection isn’t a suggestion—it’s the decisive factor between a mirror shine and a catastrophic haze. You must first identify your enemy: is that a factory clear coat or raw bare metal?
If your wheel feels smooth and looks glossy—like a piece of candy—you are dealing with a clear coat. Treating it like a raw surface is the #1 rookie mistake. A rubbing compound will shred that protective layer, leaving you with a dull, cloudy disaster. For clear-coated alloys, your go-to arsenal is a non-abrasive cleaner wax or a dedicated ceramic sealant. You’re not cutting metal; you are polishing a thin layer of paint. Stick to pH-neutral soaps and soft microfiber. Aggression is the enemy here. You want to enhance clarity, not remove the guard.
Conversely, if your wheel has a satin or brushed finish, or if you can feel the raw metal texture, you are on bare metal. This is where the real magic happens. You need a two-step system: a heavy-duty cutting compound (like Wenol or Mothers) to remove oxidation and scratches, followed by a premium metal polish (like Simichrome) to bring out that chrome-like, wet shine. Protect your progress instantly with a wheel wax because bare metal is a bare knuckle fight—it oxidizes fast.
Pro tip: Do a tape test. Rub a small dot of polish in an inconspicuous spot. If the cloth shows color (paint), stop. You’re on clear coat. If it shows black or gray, you’re on raw metal. Polish with purpose, not guesswork.

Professional Alloy Wheel Polishing Tips for a Mirror Shine
Forget just “cleaning” your alloys. A true mirror shine is an obsession with depth and clarity—it’s the difference between a car that looks washed and a car that looks possessed by greatness. Here’s the viral-ready strategy to get that liquid metal finish without burning hours.
The Gold Standard: Wet Sanding (If They’re Pitted)
If your wheels have road rash or oxidation, skip the heavy compound. Start with 1000-grit wet sandpaper on a block. Work wet—soaking the paper and the wheel continuously. Move to 1500, then 2000, then 3000 grit. Each stage removes the scratches from the last. This is tedious, but it’s the only way to kill deep imperfections.
The Non-Negotiable: A Dedicated Rotary or Drill Kit
Hand polishing alloy wheels is a losing battle. You need speed and friction to generate heat. Use a 3-inch backing plate on a drill. Apply a heavy-cut compound (like Mothers PowerBall or Meguiar’s M105) with a wool pad. Move in small, overlapping circles. The slurry should turn dark gray—that’s oxidation being removed.
The Viral Trick: The “Black” Test
After your initial cut, wipe clean with isopropyl alcohol. The finish should look dull or matte. Now, switch to a menzerna or jeweler’s rouge on a soft foam pad. Go slow. The magic happens when the friction makes the surface go from hazy to a deep, reflective black in under 10 seconds. If it doesn’t—you didn’t sand enough.
The Critically Ignored Step: Seal Immediately
A mirror shine is naked without protection. Apply a ceramic spray or high-temp wax immediately after your final buff. Brake dust acts like sandpaper on bare polished aluminum. A semi-permanent coating will make your next wash a 5-minute rinse.
Pro Tip: Avoid “all-in-one” polishes. They leave fillers that mask scratches. True depth comes from cutting the metal, not hiding it. Your wheels are the jewelry of the car—polish them like a gem cutter, not a cleaner.
How to Protect Your Polished Wheels and Maintain the Gloss
Alright, let’s get straight to it. You’ve put in the elbow grease to get that mirror-like luster on your alloys. Now, the real game begins: protecting that shine. Polished wheels are high-maintenance superstars, and if you neglect them, they’ll oxidize into a dull, chalky mess faster than you can say “road salt.” Here’s the viral-level strategy to lock in that gloss.
Step one: ditch the instant gratification. Never, and I mean never, use a generic wheel cleaner. Those harsh, acidic detergents will strip your clear coat (if you have one) or etch into bare polished metal. Instead, use a pH-neutral soap specifically designed for polished surfaces. Wash with a microfiber mitt using the two-bucket method—one for soap, one for rinsing—to prevent micro-scratches from trapped grit. Rinse immediately and dry with a soft, clean microfiber towel to avoid water spots.
Now for the secret weapon: a dedicated metal sealant or a high-quality carnauba wax. Think of it as a crystal-clear force field. Apply it in thin, even layers after every wash for the first month. This builds a sacrificial barrier against brake dust, UV rays, and moisture. Pro tip: For bare polished aluminum (no clear coat), use a metal polish with a built-in sealant twice a year. Buff by hand until it feels like glass.
The final, non-negotiable rule? Don’t let brake dust sit overnight. It’s acidic and corrosive. A quick spray with a waterless wheel cleaner and a wipe-down every few days will keep you from having to re-polish from scratch. Your wheels should blind people in the sunlight. Keep them that way.
Common Mistakes to Avoid When Polishing Alloy Wheels
As a viral content strategist, I’ve seen countless DIY wheel polish jobs go from “showroom shine” to “why-did-I-do-that” in seconds. The biggest mistake? Rushing the prep work. Jumping straight to a high-grit compound on a dirty wheel is like mopping a floor without sweeping first. You’re just grinding brake dust and road grit into the clear coat, creating micro-scratches that amplify under sunlight. Always start with a dedicated wheel cleaner and a soft-bristle brush to remove embedded debris.
Another viral fail? Using the wrong pad or tool. A standard drill with a worn-out sponge generates uneven heat, burning the lacquer and leaving hologram swirls. Instead, opt for a dual-action polisher with a medium-cut foam pad. And here’s the killer: skipping the masking tape. Alloy wheels often have tire rubber, valve stems, and painted barrels. A slip of the pad can haze the rubber or strip paint, turning a 30-minute job into a costly refinish.
Finally, over-application of compound is a meme-worthy, cringey misstep. More product doesn’t mean more shine—it means fling, haze, and wasted money. Use a pea-size amount, work it until it’s almost clear, then immediately buff off with a clean microfiber towel. Letting it dry creates a stubborn film that ruins your final look.
Pro tip from the trenches: always finish with a sealant or ceramic coating. A polished bare alloy is a magnet for oxidation. One rainy drive and that mirror finish turns into cloudy disappointment. Protect your work to keep your wheels trending—not your mistakes.
When to DIY vs. Hire a Professional Wheel Detailer
Let’s be real: you’ve spent a Saturday afternoon with a foam pad and a drill, promising yourself that a mirror finish is totally within reach. And sometimes, it is. As a content strategist who has watched the #WheelDetailing rabbit hole explode, I can tell you the line between a satisfying DIY win and a costly regret is razor thin.
DIY is your move when: You have factory clear coated wheels with light haze or oxidation. A solid grit regiment (think 1000→3000 wet sand, followed by a dedicated compound and polish) will yield showroom results. Your investment? Under $50 for supplies. Your risk? Low. If you mess up, a pro can fix it for a few extra bucks.
Call a professional when: You see bare aluminum, raw scratches, curb rash, or pitted corrosion. This is not a “just keep buffing” scenario. Amateur hands on raw metal often create “ghosting” (wavy reflections) or tear through the protective layer, causing rapid re-oxidation. A pro uses a variable-speed rotary with specialized compounds and a surface gauge to prevent this. The cost (usually $100–$250 per wheel) stings, but compare that to $800 for a replacement wheel or $400 for a recutting service.
My golden rule? If the finish isn’t reflecting your face after three passes, you’re probably grinding away too much material. When in doubt, swipe out. Let the expert handle the diamond-cut and dual-stage polishes. Your car—and your forearms—will thank you.
Frequently Asked Questions
What is alloy wheel polishing tips and who should use it?
A: alloy wheel polishing tips is a solution designed to address a specific set of needs for a defined audience. It is best suited for those seeking a reliable, well-researched option backed by clear evidence and expert guidance.
How long does it take to see results with alloy wheel polishing tips?
A: Most users report noticeable results within the first 2–4 weeks of consistent use. Significant, measurable improvement is generally observed after one to two months of dedicated application.
Is alloy wheel polishing tips suitable for beginners or experienced users?
A: alloy wheel polishing tips is designed to accommodate a wide range of experience levels, from complete beginners to advanced practitioners. Its structured approach makes it accessible without sacrificing depth for those seeking expert-level application.
Can alloy wheel polishing tips be combined with other approaches or products?
A: Yes, alloy wheel polishing tips is generally compatible with complementary strategies and tools. It is advisable to introduce any combination gradually and monitor for synergy or potential conflicts with your existing routine.
What are the most common mistakes to avoid with alloy wheel polishing tips?
A: The most frequent errors include inconsistent application, skipping foundational steps, and expecting immediate results without allowing adequate time for the process to work. Following the recommended guidelines closely is the most effective preventive measure.
How does alloy wheel polishing tips compare to similar alternatives on the market?
A: alloy wheel polishing tips distinguishes itself through its evidence-based formulation, transparent ingredient or methodology sourcing, and a track record of user-verified outcomes. Direct comparisons should be made on the criteria most relevant to your specific goals.
Are there any limitations or side effects associated with alloy wheel polishing tips?
A: While alloy wheel polishing tips is formulated to minimize adverse effects, individual responses can vary based on specific sensitivities or pre-existing conditions. Consulting with a relevant professional before starting is always a prudent step.
What is the best way to get started with alloy wheel polishing tips?
A: The most effective starting point is to begin with a foundational assessment of your current situation, then follow the recommended introductory protocol for alloy wheel polishing tips. Consistency and patience during the initial phase are the two biggest predictors of long-term success.
Summary: Polishing alloy wheels is a rewarding but meticulous process that requires the right preparation and technique. Start by assessing whether your wheels are bare metal or clear-coated, as the approach differs dramatically. For bare alloy, a progressive wet-sanding routine (400 to 2000 grit) followed by a quality aluminum polish and a motorized or hand buffing pad will restore a mirror finish. Always work in a cool, shaded environment using ample water to avoid heat damage. Crucially, never skip the protection step—sealing the polished surface with wax, sealant, or ceramic coating prevents rapid re-oxidation and makes future cleaning effortless.
Maintenance is key to long-term results. Frequent washing with pH-neutral soaps, avoiding automatic car washes with harsh brushes, and promptly treating brake dust will extend the life of your finish. If you notice hazing or corrosion returning, a light touch-up polishing (using 1500 or 2000 grit) followed by fresh protection can often restore the luster without a full strip-down. With patience and consistent care, polished